Chapter 3: Assessment of the Victim
Nazrin Ahmad and Abdul Alif bin Abdul Hamid
Learning Objectives
Type your learning objectives here.
- Define what a rapid assessment is.
- Demonstrate rapid assessment techniques.
- Explain the important components in rapid assessment.
- Describe the abnormal finding based on the DRSABC assessment.
- Explain the important information needed during rapid assessment.
3.1 Introduction to Rapid Assessment Techniques of the Victim
Rapid Assessment Techniques (RAT) refers to a systematic technique and steps that anyone, even someone without medical training, can take to evaluate an injured or ill person in an emergency. This is often the first part of FA, also known as ‘primary survey’ or ‘initial assessment’. The goal is to prioritise care by addressing life-threatening conditions first, followed by less urgent issues. As a FAr, you will encounter two types of victims: a) someone who is injured or ill. It’s not about diagnosing a specific illness or injury, but rather about checking the basics to keep the person alive until professional help arrives. Think of it like triage in a crisis: You’re not fixing everything, you’re just spotting the significant dangers right away.
3.2 Important Components in Rapid Assessment Techniques
First Aid Rapid Assessment Techniques (RAT) consist of two key components: the systematic and standardised sequence outlined by the European Resuscitation Council (ERC) known as DRSABC (Danger, Response, Shout for help, Airway, Breathing, Circulation), and the quick assessment of a victim’s level of consciousness using the AVPU mnemonic (Alert, Verbal, Pain, Unresponsive). To make it practical and easy for the layperson to follow, the RAT begins with identifying the potential risk from the environment and the victim, followed by determining the level of consciousness, calling for assistance, and managing the airway, breathing, and circulation to address both types of conditions.
3.3 What is DRSABC and AVPU?
The DRSABC is a standard approach that provides a structured and straightforward method for managing both injuries and illnesses during an emergency, particularly before medical professionals arrive. It begins with Danger (D), where the first aider checks the surroundings to ensure safety from hazards such as traffic, fire, or electricity, preventing further harm to themselves or the victims. Body fluid can also be considered a hazard for the rescuer. Once the area is safe, the next step is Response (R), where the victim’s level of consciousness is assessed using the AVPU approach. This helps determine the severity of the situation and whether immediate action is necessary. The step of Shout for Help (S) is crucial because calling emergency services or alerting others ensures that professional medical assistance is on the way while first aid is being given. The next stage, Airway (A), focuses on ensuring that the victim’s airway is open and clear, since many medical emergencies, such as choking, fainting, or collapse, can block normal breathing. After this, Breathing (B) is assessed to check whether the casualty is breathing normally or needs urgent support. If breathing is absent or abnormal, cardiopulmonary resuscitation (CPR) should begin immediately. Finally, Circulation (C) involves maintaining blood flow through CPR and using an Automated External Defibrillator (AED) if available or monitoring circulation in victims who are breathing but may show signs of shock or illness.
3.3.1 DRSABC: Danger
- Assess the scene and look for actual or potential hazards such as fire or smoke, electricity, chemical spills or gases, sharp objects, unsafe crowd, etc.
- Apply protective equipment such as a surgical mask, disposable gloves, and a face shield to protect yourself from infectious diseases or as a precautionary measure.
- If safe, eliminate the hazard by switching off the electrical supply or moving hazardous objects away from the victims.
- Move the victims using appropriate techniques if required. Reassess the hazards continuously.
3.3.2 DRSABC: Respond
Check the ‘respond’ by using the AVPU mnemonic:
| A – | Alert | : | The victim is awake, can talk or move, and responds appropriately. |
| V – | Verbal | : | The victim only responds when spoken to (e.g., opens eyes, moans, or answers slowly). |
| P – | Pain | : | No response to voice, but reacts to a painful stimulus (e.g., pinching the earlobe, pressing the nail bed). |
| U – | Unresponsive | : | No reaction at all, the victim is unconscious. |
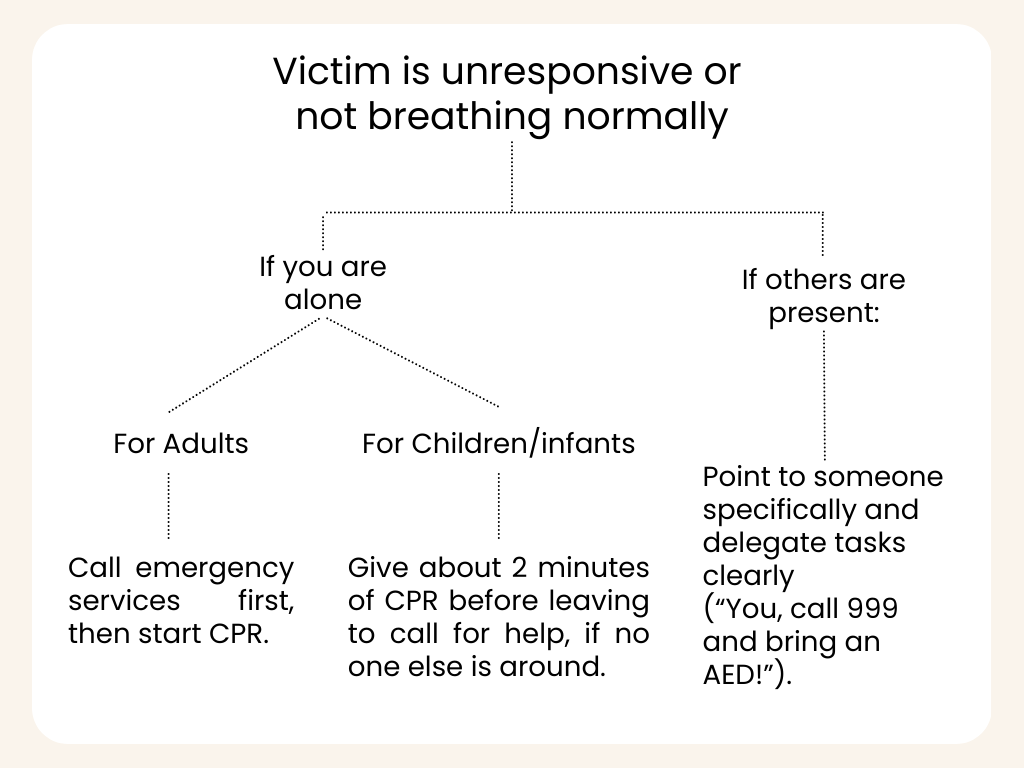
3.3.3 DRSABC: Shout for help
As soon as you confirm that the victim is unresponsive or not breathing normally:
3.3.4 DRSABC: Airway
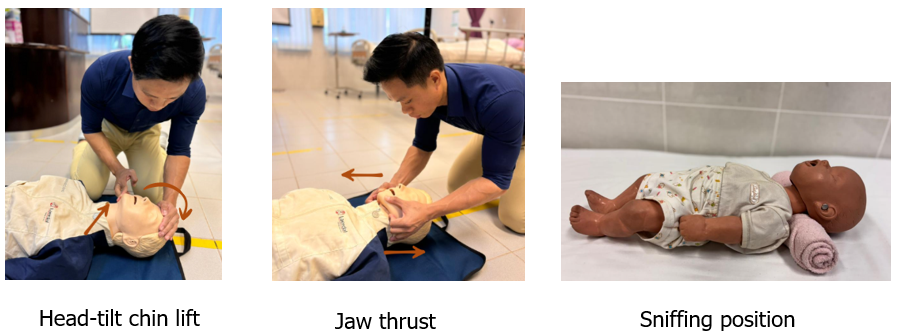
If the victim does not respond to your call, proceed to assess and open the airway if required. Open the victim’s mouth to identify if there is a foreign body or anatomical abnormality that blocks the airway, such as the fall back of the tongue. To open the airway, you may use several techniques as follows:
Default technique (all ages >1 year): Head-tilt/Chin-lift:
-
- One hand on the forehead → gently tilt the head back.
- Two fingers under the bony chin → lift the chin upward (avoid pressing the soft tissues under the jaw).
If spinal/neck injury is suspected:
-
- Try a jaw thrust (place fingers behind the angles of the jaw and lift forward) while keeping the head in neutral.
- If the airway remains blocked, prioritise life. Carefully add a small head-tilt/chin-lift as needed to open the airway.
Infants (<1 year) & small children:
-
- Aim for a neutral “sniffing” position (a rolled towel under the shoulders may help infants).
- Avoid overextending the neck.
3.3.5 DRSABC: Breathing
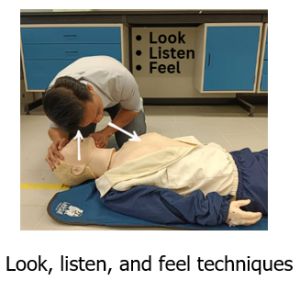
3.3.5.a Perform rapid breathing assessment (5–10 seconds)
-
- Look for chest/abdomen movement, as well as any obvious obstructions in the mouth.
- Listen for breathing sounds: normal, snoring (tongue), gurgling (fluid), high-pitched stridor (tight/blocked upper airway).
- Feel for air movement from the mouth/nose.
- Red flags: unable to speak/cry, noisy breathing, drooling, cyanosis (blue lips), paradoxical chest/abdomen motion.
3.3.5.b Abnormal finding in ‘breathing’ assessment:
-
- Absence of breathing (no chest rise).
- Abnormal breathing pattern:
- Agonal Breaths: irregular, gasping, or snorting sounds; often seen in cardiac arrest.
- Shallow or weak breathing: minimal chest movement, inadequate air exchange.
- Laboured breathing: using neck or chest muscles excessively, visibly struggling to breathe.
- Noisy breathing:
- Gurgling: may indicate fluid or vomit obstructing the airway.
- Wheezing: a whistling sound, often due to asthma or airway narrowing.
- Stridor: a harsh, high-pitched sound indicating upper airway obstruction.
- Snoring respirations: tongue partially blocking the airway in an unconscious person.
- Abnormal rate:
- Too slow (bradypnea) may indicate drug overdose, brain injury.
- Too fast (tachypnea) may suggest shock, asthma attack, severe bleeding, or anxiety.
- Cyanosis
Key Action for Non-Medical Professionals
• If breathing is absent or abnormal → treat as not breathing normally.
• Start CPR immediately and call emergency services.
• Place the casualty in the recovery position only if they are breathing normally and safely.
3.3.6 DRSABC: Circulation
The circulation assessment can be divided into two main components: medical cases and trauma cases. A medical case involves conditions resulting from physiological abnormalities. In contrast, a trauma case refers to injuries caused by external forces, which may lead to internal bleeding, external bleeding, or fractures.
- Medical circulation assessment:
- Palpate the neck (carotid) pulse within 10 seconds. If no palpable pulse, commence high-quality cardiopulmonary resuscitation (CPR).
- Trauma circulation assessment:
- Observe for any visible external and internal bleeding and determine its location.
3.4 The examples of the application of DRSABC in medical and trauma cases
3.4.1 Case 1: Severe haemorrhage (Injury)
You are in an office workshop when you hear a loud crash. A colleague has accidentally cut their arm deeply on a piece of broken glass after tripping over a toolbox. Blood is flowing heavily from the wound, and a few bystanders are panicking. What would be your action:
- Danger (D): Before rushing in, you quickly check the area. There is broken glass scattered on the floor, and machinery nearby. You ensure the power is turned off and ask others to keep away from the sharp glass to prevent further injuries.
- Response (R) + AVPU: You kneel beside your colleague and speak to them: “Can you hear me? Are you okay?” They respond weakly, showing they are still Alert but in pain. You continue to check using the AVPU scale. They respond to your voice but appear dizzy.
- Shout for Help (S): You immediately ask a coworker to dial 999 (or 112) and provide clear instructions to report a severe bleeding incident, including the location and the number of casualties.
- Airway (A): As the casualty becomes pale and less responsive, ensure their head is in a safe position and their mouth is clear, maintaining an open airway.
- Breathing (B): You observe their chest movement and confirm they are still breathing normally, although shallow due to shock.
- Circulation (C): You take a clean cloth from the first aid kit and apply firm, direct pressure to the bleeding wound to slow the blood loss. You reassure your colleague, keeping them calm, warm, and conscious until emergency services arrive.
3.4.2 Case 2: Asthma attack in the office
During a busy morning in the office, one of your colleagues suddenly starts coughing and wheezing after someone sprays an air freshener nearby. They clutch their chest and struggle to catch their breath.
- Danger (D): You quickly remove the trigger by opening a window and asking others not to spray anything else in the room. You ensure the environment is safe from further irritants, such as smoke or dust.
- Response (R) + AVPU: You approach the colleague and ask, “Can you talk to me? Do you have your inhaler?” They nod and try to speak, but can only manage short words between breaths. This means they are Alert but struggling. If they could only respond to Verbal prompts or Pain, or became Unresponsive, it would signal a life-threatening attack.
- Shout for Help (S): Since the attack appears severe, ask another coworker to call 999 (or 112) and report an asthma emergency, providing the office location and details of the casualty’s condition.
- Airway (A): Encourage the casualty to sit upright and slightly lean forward, which helps keep their airway open and makes it easier for them to breathe.
- Breathing (B): You monitor their breathing, which is fast and noisy, and help them take their reliever inhaler. You stay calm and reassure them while watching for any changes.
- Circulation (C): You stay close in case their condition worsens. If they were to collapse and stop responding, you would immediately begin CPR and use an Automated External Defibrillator (AED) if available.
3.5 Possible finding from the ‘Rapid Assessment Techniques’

Key Takeaways
Type your key takeaways here.
- The FAr may perform the ‘airway’, ‘breathing’, and ‘circulation’ assessment simultaneously, however, the management always begins with the ‘airway’ followed by ‘breathing’ and ‘circulation’.
- Ongoing assessment is essential, as the victim’s condition is dynamic and may sometimes require modification of techniques to preserve life.
